

How to Build the Perfect Itinerary
I am a HUGE fan of itineraries on vacation! I know that they may not be for everyone, but trust me, once you try using one, you’ll see the difference almost immediately. I’ve gone on vacations without one, and I deeply regret not doing more research and planning beforehand. I’ve been let down that the museums I wanted to visit were closed on the day that I walked by, and I’ve been disappointed and stranded without somewhere to eat dinner.
It took me a couple of years to format my itinerary template to include all the useful information you’ll need when abroad, and I’ve recently refreshed it and can’t wait to share it with you all!
Now, for those of you who are rolling your eyes, this is not an itinerary that details your every move for the entire trip, but it does include a lot of details. I’ve created this itinerary template to store all the information for the places you want to visit while on vacation, such as addresses, costs, hours of operation, etc., so that it’s easier for you to maximize your time.
I'll outline a few steps below and explain how Google Maps will become your new best friend. Paris will be the example in this post so that you can get a visual for each step. If you read this article and find it helpful, then please sign up to be on my email list, where you’ll receive a free travel itinerary template. And if planning a trip makes you feel overwhelmed, then check out my Trip Planning Service, where I essentially plan out an itinerary just like this one for you, customized to your needs and preferences, and can even recommend accommodations for you. I’ve found this to be the best way to build the perfect travel itinerary, so let’s get to it!
Brainstorming Activities and Restaurants
You’ll start by using the 2nd tab on the Traveling Tessie Itinerary Template (join my email list for my free template!). The 2nd tab is for brainstorming the activities you would like to do on your vacation and where you’d like to eat. Activities go in the top section, while Restaurants go in the bottom section of the template. I typically start researching on Pinterest and YouTube. Once you have your list of activities and restaurants, you’ll need to Google each place and fill in the information below in your template:
Code: This is a custom code that you assign to each line as you’re filling in the Activity+Dining List tab (Tab 2). I use #+A for an Activity and #+R for a Restaurant. Just make sure each line has a unique “code” because you’ll add the Code to Tab 1, and the other information will automatically populate.
Cost: This helps for budgeting
Note: Hours Open & note any days the activity is closed
Duration: How much time do you think you will spend there
Their website link: This comes in handy if you need to purchase tickets in advance
Neighborhood/Area: This section is crucial if you’re like me and want to make the most of your vacation time. I always group my days by neighborhood so that I’m not running around all day and wasting time.
Setting Up Your Google Map
While you are looking up all of your prospective activities on Google, you’ll need to “Save” the location to your Google Maps (see image below). When you save a place on Google, there are three options: “Want to Go”, “Favorites”, or “Starred Places”. You can use these options however you see fit, but I, personally, use them in the format below:
“Starred” - the hotel I’m staying at
“Favorites” - restaurants I want to try
“Want to Go” - museums & activities
By saving the places you’ll be visiting on Google Maps, you’ll be able to get a visual on how to break up your days by area so that you’re not wasting a ton of time trekking back and forth across the city. Once you identify your areas, group all activities in each area and label them on the template on the 2nd tab from Step 1 in the “Neighborhood/Area” column. You can be specific and use the actual area’s name or label them with letters A, B, C, etc. I like to highlight each area in a different color on the Activities tab so I can see what exactly should be done on the same day.

Filling In Your Itinerary
This is the last step, and you’ll be filling in the 1st tab on the template, the main itinerary template page! First, you’ll fill in your flight and hotel information in the top section. Your first day below can start either on the day you land or on your first full day there, depending on your arrival time. You’ll refer to the 2nd tab, which lists activities grouped by area. Choose the order you want to visit each place based on its hours of operation, and add the custom code you gave the line to the timeslot and day on Tab 1.
You’ll repeat this for each day until you’ve filled in enough to last your entire trip, and don’t worry, if you want a relaxing day, that’s totally fine! I usually make one of my last days an exploring day where I can revisit a shop that I passed days prior but didn’t have a chance to go inside, or just walk around a different area, or go to the beach. It’s your itinerary so you can get as detailed as you want!
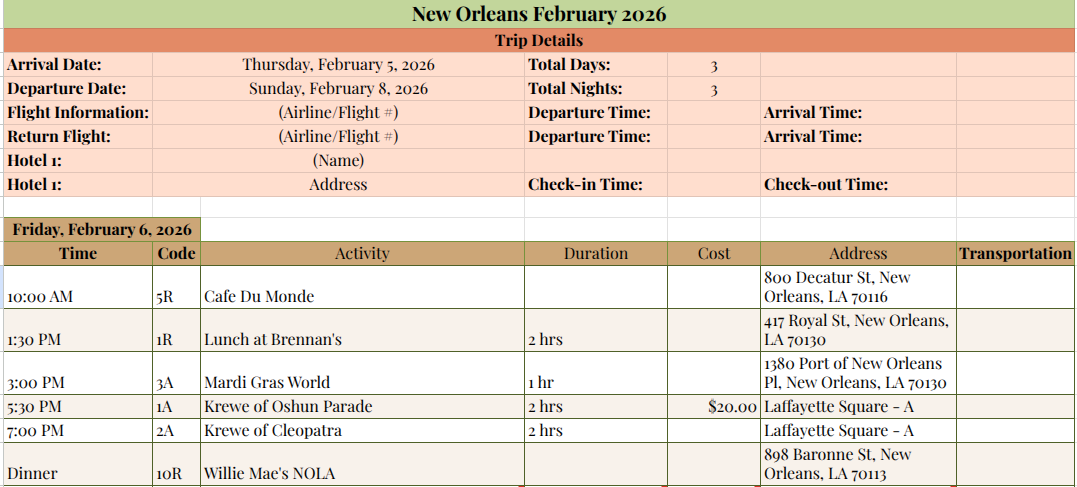
Now, by using this itinerary template, you should be able to build the perfect travel itinerary for your next trip! I can’t express how much this has really changed the way I travel. The 1st tab with your full itinerary is essentially an easy 1-pager that you can print and bring with you in your carry-on. I use it SO much on all of my trips! It’s a great way to keep me on track as I plan everything, from what I'd already bought tickets for to what I still need to pay for when we get there.
As always, I’m happy to hear from you guys and would love to answer any of your questions or help if I can! And if you don’t want to make your own itinerary, be sure to check out the custom itinerary service I offer, where I will build one of these out specifically for your trip!
Happy travels!
-Tess


Tess Arnold
Hi! I’m Tess, founder of TravelingTessie.com, and not only do I love to travel, but I love immersing myself in new places and finding off the beaten path experiences wherever I go! I’ve lived in 4 different states & traveled to 13 countries and counting. I believe that tourism is meant to benefit both visitors and locals alike—and I want to bring that idea back into the travel industry by highlighting companies run by locals such as tours, hotels, restaurants, and more. On Traveling Tessie you can find hidden gems in top destinations around the world, travel tips, detailed city guides, and tons of inspiration for your next trip! If you love travel as much as I do, then please join me on this journey! I hope you enjoy my content as much as I enjoy providing it for you!